

Yesterday, I hiked Iztaccíhuatl without a guide. I summited the peak in about 10.5 hours (car to car) and did the entire trip self-supported. I’m here to share my tips and help you decide if you’re ready for this amazing challenge with – or without – a guide.
Iztaccíhuatl is an extinct volcano. Her neighbor, Popocatepetl, is an active volcano that spews ash and smoke regularly. The views of Popo are one of my favorite aspects of the hike up Izta.
At 17,160ft, Iztaccíhuatl is the third-highest mountain in Mexico and the seventh highest in North America. She’s not a challenge to be taken lightly!
In this article (click to jump to a section):
- Do I Need a Guide for Iztaccíhuatl? How To Decide
- How Do You Get to Mt. Iztaccíhuatl?
- How Long Does it Take to Hike Iztaccíhuatl?
- Can I Hike Iztaccíhuatl in One Day?
- Trail Overview of Mt. Iztaccíhuatl (And My Tips)
- What Should I Pack to Hike Izta?

Do I Need a Guide for Iztaccíhuatl? How To Decide
I wasn’t entirely sure if I was ready to attempt Izta – altitude 17,160 ft – without a guide. Here’s how I decided to go for it:
- Have humility: I promised myself that if I felt sick, got lost, got scared, or if the conditions seemed unsafe, I’d turn around. I know myself and I trust that I’ll keep myself safe. In the past, I’ve foregone summits on Mt. Harvard, Pike’s Peak, and Mt. Yale – so I believe I am able to make a clearheaded decision even when I REALLY want that summit.
- If you don’t trust yourself to make that decision wisely (hello, summit fever) or don’t know for sure that you can recognize an unsafe situation, get a guide.
- Build up your experience and expertise. Fitness does NOT correlate with acclimation. My mom qualified for the Boston Marathon and cannot keep up with me on trails over 5,000 feet above sea level. She’s fitter than I am, but my body is adjusted. Furthermore, travel on loose scree, talus, mud, ice, and snow are specific skill sets you may not gain from backpacking trips at lower altitudes. Before even CONSIDERING hiking Izta, I hiked thirteen 14,000+ peaks in Colorado: Pike’s Peak, Holy Cross, Evans, Massive, Bierstadt, Red Cloud, Sunshine, Greys, Torrey’s, Uncompahgre, Elbert, Belford, and Oxford. I also hiked the Salkantay Trek in Peru, which gave me a bit of experience over 14,000 feet.
- If you don’t know what scree or talus are, or the difference between an ice ax and glacier ax, you probably need a guide.
- Prepare for the risks of high altitude travel. At 17,160 feet tall, Izta is over THREE MILES tall. If you get short of breath in Denver, imagine three times that. I re-familiarized myself with the symptoms of AMS, HACE, and HAPE to ensure that I could recognize them in myself. I also hiked a 14,000 foot mountain (Pike’s Peak in Colorado Springs) about a month ago to test my legs and lungs. Finally, I spent a week at 7,500 feet above sea level going for daily runs to help myself adjust.
- If you’ve never heard of HACE, HAPE, or AMS and don’t know how to recognize and treat them, you’ll want a guide.
- Prepare for trail emergencies. I also ensured that my possibles pouch had the right medications and gear to treat anything that, given my WFR certification, I can treat on myself. I’ll put together a full post on my possibles pouch soon. Basically, it includes everything from the 5 C’s of survival to basic med kit supplies to a space blanket, whistle, and signal mirror. Thanks to my WFR certification, I feel relatively confident that I can make a splint or stop the bleed for most injuries where I have maintained consciousness given the tools I have on hand. I also always carry my fully-charged Spot Beacon on trails like this.
- Study the route. I use AllTrails Pro to download a map onto my phone and spent quite a bit of time studying blogs and forums like this one to prepare myself for Izta. If you’re reading this blog, you’re already off to a good start!
While I’m very proud of summiting Izta solo, I had really hoped to hike with a friend. Even though I was quite prepared and have solid experience, I didn’t have as much experience above 15,000 feet as I’d like before attempting something like this solo. Furthermore, if I were to fall and break an ankle (or worse, hit my head), a partner would be extremely helpful to stay safe.

How Do You Get to Mt. Iztaccíhuatl?
Attempting Izta was one of my goals as I drive the Pan-American Highway from Tuktoyaktuk to Tierra del Fuego. Since I live in a van, I obviously had my own vehicle with me! This makes things easier.
One of the benefits of working with a guide is that they can arrange pick-up in Mexico City and transport to Iztaccíhuatl for you. If you don’t have your own car or aren’t super confident navigating crazy city streets, ultra-windy mountain roads, and tricky pothole-riddled dirt roads, don’t drive yourself to Iztaccíhuatl.
I started at a friend’s place in Teoloyucan, about 2.5 hours from the La Joya campsite. The urban driving through the CDMX/Mexico DF/Mexico City area was tricky in my van; luckily it’s not my first rodeo with international city driving!
Grab gas and last-minute supplies in Amecameca as needed. I wish I’d grabbed more snacks – there are plenty of taco stands on the drive up, but nowhere to get bars or fruit or other packable snacks.
The road from Amecameca to Parque Nacional Iztaccíhuatl-Popocatepetl was narrow, windy, and quite steep. On Sunday it was FULL of road bikers to dodge. There’s no real good place to pass and navigating with a large van was a bit tricky.

At the top of the road, there’s a big parking lot and roundabout. If you want to take the bumpy dirt road shortcut to Puebla or head to Parque Ataplaco, you’ll go around the roundabout and then down the dirt road. I headed there first before finding that Ataplaco didn’t have space, so I had to turn around for La Joya.
If you’re heading right to Izta, go almost all the way around the roundabout and exit towards the barrier and small building; they’ll lift the barrier for you to go up to the trailhead. I paid 108 pesos for entrance, but a young couple from Germany said they paid 100 pesos for both of them. You must pass this gate before 6pm.
From there, it’s a long, slow 7km up to the La Joya trailhead/camping area. I made it just fine in my 2006 Dodge Sprinter (no 4WD), but it’s slow going and I was grateful for the brand-new shocks that BLS Autowerkz installed for me in Denver before departure.
On Sunday evening, the trailhead was a ZOO full of quesadilla and taco sellers, many guided groups, and motorcyclists up to enjoy the views. I ended up parking about 1/4 mile away at a separate little campsite for some extra privacy.
On Monday, however, there were only 3 or 4 cars in the huge lot. I ended up being one of probably ~8 groups on the mountain on Monday. Of those, ~4 groups spent the night partway up the mountain and did the hike in two days (more on that below) and several others were just headed to the hut. I believe I was the only one to hike from the parking lot to the summit and back down.
How Long Does it Take to Hike Iztaccíhuatl?
AllTrails says that this hike will take 7 hours. THIS IS NOT TRUE. Iztaccíhuatl took 10.5 hours to hike. I hiked pretty fast and light, passing a few groups on the way up. Don’t be fooled by the fact that the hike is less than 10 miles (AllTrails says 7 miles, but my recording says 8.5) – you will be moving EXTREMELY slowly for most of the hike, including the descent. I expected to make up time on the way down and did not due to the loose volcanic ash and gravel; it’s a treacherous descent that requires slow, thoughtful footwork.
In fact, legendary mountain guide Vern Tejas was on the mountain at the same time as me and remarked that I was moving pretty quickly. I say this partially because I’m proud of it, and partially to illustrate that I wasn’t slower than the AllTrails estimate due to my own speed; the AllTrails estimate is wrong.

Can I Hike Iztaccíhuatl in One Day?
Yes – if you’re experienced, fit, acclimated, and relatively fast.
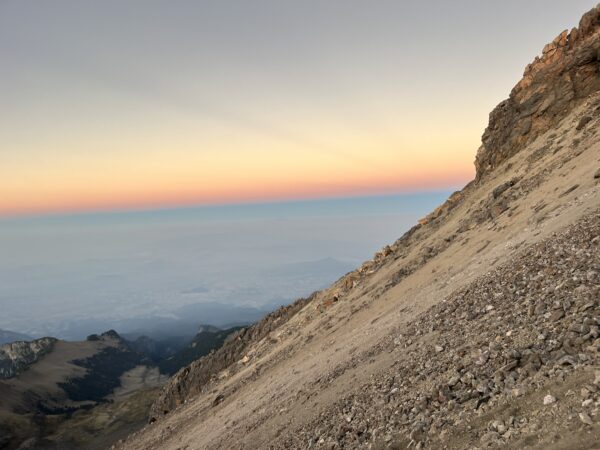
I started at 2:45am and was back at my car around 1pm. This timing was just about perfect; I got many clear views of Popocatepetl, Puebla, and Mexico City on the way up before everything was covered in clouds but I also didn’t have to hike any technical sections in the dark.
It was cold at the start – I was crunching through frost for the first few hours and was wishing I had mittens at times. By the end of the trail, I was in shorts and a long-sleeve running shirt.
Many other reviews starting at the La Joya parking lot/camping area suggested starting closer to 12:30am. I am glad I didn’t do this, as I’d have hiked many of the technical sections in the dark given my pace, but this may make sense if you’re not moving quite as quickly.
However, most of the groups I encountered hiked Iztaccíhuatl in two days. They hiked ~2.2 miles in on day one, getting themselves to somewhere around the Refugio at 15,500 feet. They then camped for the night and started their hike closer to 5am.
As I noted above, this is a VERY slow hike. Large sections are either above 16,000 feet and/or somewhat technical class 3 scrambling and/or loose ash/gravel combination. I often average 3 miles per hour even on big hikes; my average on Izta was 0.9 miles per hour.
Doing the trail in one day was fine for me, but I was pretty miserable on the descent due to fatigue.

Trail Overview of Mt. Iztaccíhuatl (And My Tips)
Overall, I loved hiking Izta. This mountain has been on my bucket list for years, and I’m thrilled to have completed it alone and without a guide. I’m not going to do a play-by-play review of the trail itself (use SummitPost and AllTrails for that), but I’ll give you an overview of my day:
- 2:15am: wake up, drink 1L of water + Accli-Mate, eat some simple carbs, triple-check my gear.
- 2:45am: hit the trail
- 3:25am: 1 mile done. 725 feet of elevation gain. I got a bit lost around Portillo 1; I tried to follow the ridgeline but you actually descend straight rather than curving left onto the ridge. Very dark, quite cold.
- 5:30am: 2 miles down. Mile 2 had 1,352 feet of elevation gain. I could start to see the dawn light peeking up near Orziba and Puebla. Just GORGEOUS.
- 6:30: 3 miles down. Mile 3 had 1,240 feet of elevation gain. This is where things got technical. I linked up with Vern Tejas and Carel for a while between miles 2 and 3 and really enjoyed their company. Alpenglow showed up around this time as well and we got some gorgeous silhouettes of Popo and his ashen tears.
- 7:40am: 4 miles down. Mile 4 had 830 feet of net gain. Around 7:30 I hit the mangled mess of an old shelter at a false summit. This is where I really started feeling bummed out. I seriously considered taking a fake summit selfie on top of one of the false summits, but couldn’t quite do it and pushed on.
- 8am: I hit ANOTHER false summit right before the glacier. I don’t know why I kept getting fooled by false summits when I knew there was a glacier crossing that I hadn’t done yet. This is where I put on my Yak Trax. I took a break for about 20 mintues here.
- 9am: SUMMIT around 4.25 miles in! Mile 5 had just 341 feet of net gain; but this includes the descent as well. I spent about 15 minutes at the summit because I was in a rush to get home to the dogs.
- 9:40am: I hit the glacier field on the return. It was still nice and crunchy, grippy snow at this point. I met a couple of young French men on the glacier.
- 11:20am: I made it past the Refugio on my descent. I thought I was done with the technical, scary descent (again, it’s SO loose), but I was wrong. I did get a break for a while on the ridge before the difficulties around the Portillos. I fell 2-3 times in this section.
- 12:30pm: sadness set in. I just wanted to be done. I hit grass around this point after being mostly vegetation-free for the remainder of the hike above here. I fell another 3-4 times in this section.
- 1pm: very slippery mud on the last 300 feet before the parking lot.
Here are my basic tips and reminders:
- Iztaccíhuatl has a LOT of false summits. I didn’t count, but I was fooled by at least 4 or 5. If you haven’t hit the giant glacier yet, you still have a ways to go. Even after the giant glacier, I had 1 or 2 false summits before reaching the first real summit.
- Use AllTrails Pro and a downloaded map. I ensured I had a fully charged phone at the start and used the AllTrails Pro downloaded map and navigation feature. I had 21% battery at the end of the trail, even with frequent map checks and several texts from various high points along the trail. The AllTrails map helped me out twice when I accidentally hopped onto a social trail and deviated from the real trail. It also helped me check my progress in distance and altitude. HOWEVER, note that AllTrails says the hike is 7 miles but measured my distance as 8.5. It’s not perfect.
- The trail is steep and slippery. This hike is pretty steep on both the ascent and descent. On the way up, this means it’s a real quad-pumper that will make you gasp for air. This was more problematic on the way down, where I slipped and fell at least 6 times. I only cut myself once, but this was scary and frustrating. The volcanic ash/gravel mix is EXTREMELY slick and the steep trail does not help. I often had to side-step and/or kick small steps for myself into the ash/gravel. In fact, the glacier traverse felt secure in comparison.
- You’ll be above 16,000 ft for 4+ hours. This really surprised me despite studying the map; you have a LONG ways to to to cover the last 1,000 feet of elevation gain. The ridgeline traverse (riddled with false summits) is slow going simply because you can’t breathe. There’s a fair bit of ascent and descent, which can be discouraging when you just want to sit down and eat a taco de barbacoa.
- You’ll need to use your hands. There are several points above the Refugio (2.2 miles in/15,500 ft altitude) where I had to put my poles away and use my hands. This was definitely a 3-points-of-contact zone of the hike. I felt comfortable not being roped up, but it was nerve-wracking at points.
- …AND trekking poles or a glacier ax. On the way up, I mostly used my trekking poles to give my quads an “assist.” They also helped me feel comfortable on the glacier crossing. On the way down, the trekking poles were a MUST-HAVE. I was slipping and sliding all over the place and really needed the poles to stay upright. Some of this was fatigue and altitude, but it also was just terrible footing. I felt totally confident with the poles instead of an ax.
- …And traction. I got away with Yak Trax pretty comfortably on my hike, but most of the other parties on the trail had more aggressive crampons like these. One French man I met didn’t have any traction at all and seemed quite comfortable on the glacier (we passed there as I descended and he ascended), but he was wearing technical mountaineering boots and seemed quite confident on mountains. A Mexican guide scolded me for not having real crampons. If there were more snow on the peak (possible seasonally), I’d probably want more technical crampons or at least more aggressive Yak Traks. I only hit snow at the big glacier, so I was fine how I was.
- ... And a helmet. I REALLY wish I’d had a helmet. Above the Refugio, there’s HUGE risk for parties above you to kick rocks on your head. And any time I’m forced to use two hands on a climb, I feel I should be wearing a helmet. On my descent between Portillo 2 and 1, there was a rock slide just a quarter mile behind me. Several rocks the size of pumpkins came crashing down the mountain, bouncing 20+ feet in the air and dislodging other rocks. If I’d been in their path, I easily could have been very severely hurt. I didn’t see any reason for the rocks to come down at all.

What Should I Pack to Hike Izta?
I fit everything I needed for Iztaccíhuatl into a 35L backpack and felt pretty happy with my decisions (except for the helmet omission). I’ll break things down by category below.
Layers and Clothing
- On my body from bottom to top:
- La Sportiva hiking boots
- Darn Tough socks
- Light hiking pants (I removed for the last 2/3 of the descent)
- Running shorts (for the descent in the sun)
- Long sleeve running top
- Sports bra
- Lightweight long-sleeve quarter-zip
- Fully charged headlamp
- Ballcap
- Sunglasses
- In my backpack (used):
- Light jacket – I took this on and off throughout the hike
- Buff – worn for the first mile, then put away. For ear warmth, could use hat instead.
- Lightweight running gloves – on and off throughout hike
- Midweight fleece-lined waterproof gloves – on and off throughout hike
- In my backpack (didn’t use but glad I had):
- Down jacket – I almost put this on at various rest stops but ended up not needing it. If anything had gone wrong I’d definitely have wanted this!
- Rain jacket – never be without this above treeline!
- In my backpack (probably didn’t need):
- Gaiters
Safety
- Yak Trax: I wore these starting at the glacier on the way up and until I hit the Refugio on the way down.
- Trekking poles: I used these for practically the entire hike
- A helmet: As I said, I didn’t bring one but REALLY wish I did.
- A fully charged phone with AllTrails pro and the Izta route downloaded
- Spot Beacon, fully charged
- Sunscreen
- Chapstick
- My Possibles Pouch: this is an amazing little pouch that doubles as a first aid kit and survival kit. I always throw it in the bottom of my backpack if I’m going more than a couple miles. I’ll break down the contents below:
- First aid kit: gauze, vet wrap, bandaids, antibiotic cream, alcohol wipes, a syringe (to flush wounds), pain meds, antihistamines, q-tips, steristrips, tweezers etc.
- A signal mirror
- Rescue whistle
- Space blanket
- 3x 15ft lengs of paracord
- A folding knife
- A lighter AND a ferro rod
- Firestarter
- A Sawyer mini water filter and its matching waterbag
- Hand warmers
- Spare sunscreen and chapstick
Food and Drink
Honestly, I messed up on food. I got by just fine with what I had, but you can do better than me. I was getting over food poisoning and wasn’t feeling very hungry on the hike. I’ll include what I did bring as well as what I should have brought.
- 3L of water in my Camelback. I drank 1L right before bed and 1L before leaving in the morning, both with Accli-Mate mixed in. I drank about 2.5L during the hike. I’m glad I had 0.5L at the end because this meant I had an extra margin if something had gone wrong.
- What I had and ate: mostly packaged cookies from a corner store, plus a couple spoonfuls of peanut butter. As I said, you can do better.
- What I brought but didn’t eat: a hard-boiled egg (I was too lazy to peel), a guayaba (just didn’t sound good), several more tablespoons of peanut butter (just didn’t get to it), cheese (my stomach rolled at the thought of something that intense).
- What I should have brought: normally on a hike like this, I’d bring several protein bars, an apple, and maybe a sandwich. This would have been much better!
I hope you enjoy hiking Iztaccíhuatl as much as I did, whether you do it with or without a guide! Let me know how your ascent goes in the comments below.

Great tutorial and nice job reaching the summit solo. I was in the area around Nov ‘22. I had Home La Malinche about a week prior and was eager to push for Izta solo. However I was a bit ill-equipped and then some nasty weather moved in over my window, so I regretfully had to hold off.
Now I’m planning again. Thanks for the info and sharing your experience!
-Zach